반응형
[Tkinter 2편] 위젯 배치, 위치 설정
파이썬 Tkinter 패키지를 사용하여 직접 GUI를 만들어 사용하는 방법을 공유합니다.
목차:
1. Tkinter 위젯 배치 방법 소개
- Tkinter에서 Button, Entry 등 "위젯"을 배치하기 위해서 아래의 3가지 방법을 이용할 수 있습니다.
- Place (절대좌표)
- Pack (상대위치)
- Grid (격자형 배치)

- 예시
button = tk.Button(root, text="테스트")를 배치하기 위해:- Place :
button.place(x=1, y=1) - Pack :
button.pack(side="left") - Grid :
button.grid(row=1, column=1)
- Place :
하나의 프레임 내에서 Place / Pack / Grid 를 동시에 사용할 수 없습니다.
2. Place 절대좌표 배치
하나의 프레임 내에서 Place / Pack / Grid 를 동시에 사용할 수 없습니다.
- Place는 지정한 프레임 내에서 x, y 좌표값을 직접 입력하여 위젯을 배치할 수 있습니다.
- 위젯 위치를 정밀하게 배치할 경우 유용하게 사용할 수 있습니다.
.place(x= x좌표, y= y좌표)
## tkinter를 tk로 선언
import tkinter as tk

## Tk setup
root = tk.Tk()

# GUI Window 제목 설정
root.title("Camp Lee Python")
# GUI Window 사이즈 설정
root.geometry("240x150")

btn1 = tk.Button(root, text="버튼1")
btn1.place(x=3, y=5)
btn2 = tk.Button(root, text="버튼2")
btn2.place(x=50, y=24)

root.mainloop()
3. Pack 상대좌표 배치
하나의 프레임 내에서 Place / Pack / Grid 를 동시에 사용할 수 없습니다.
- Pack은 지정한 프레임 내에서 위젯 간의 상대적인 위치로 위젯을 배치할 수 있습니다.
- 상대위치를 사용하므로 먼저 작성된 코드가 먼저 적용됩니다. (코드 순서에 영향을 받음)
- 위젯을 간편하게 배치할 때 유용하게 사용할 수 있습니다.
- 윈도우 창 크기를 변환할 때 위치에 맞게 조절됩니다.
.pack(side="위치")
## tkinter를 tk로 선언
import tkinter as tk

## Tk setup
root = tk.Tk()

# GUI Window 제목 설정
root.title("Camp Lee Python")
# GUI Window 사이즈 설정
root.geometry("240x100")

entry = tk.Entry(root)
entry.pack(side="top")

btn1 = tk.Button(root, text="예", width=10)
btn1.pack(side="left")
btn2 = tk.Button(root, text="아니오", width=10)
btn2.pack(side="right")
btn2 = tk.Button(root, text="닫기", width=10, command= root.quit)
btn2.pack(side="bottom")

root.mainloop()
4. Grid 격자형 배치
하나의 프레임 내에서 Place / Pack / Grid 를 동시에 사용할 수 없습니다.
- Grid는 지정한 프레임 내에서 격자형태로 위젯을 배치할 수 있습니다.
- 위젯을 격자형으로 배치하고자 할 때 유용하게 사용할 수 있습니다. (예시 : 계산기의 숫자패드)
- 행과 열 번호로 위젯을 배치할 수 있습니다.
.grid(row= 행번호,column= 열번호)
## tkinter를 tk로 선언
import tkinter as tk

# GUI Window 제목 설정
root.title("Camp Lee Python")
# GUI Window 사이즈 설정
root.geometry("241x130")

btn_min = tk.Button(root, text="-", width=10)
btn_plus = tk.Button(root, text="+", width=10)
btn0 = tk.Button(root, text="0", width=10)
btn1 = tk.Button(root, text="1", width=10)
btn2 = tk.Button(root, text="2", width=10)
btn3 = tk.Button(root, text="3", width=10)
btn4 = tk.Button(root, text="4", width=10)
btn5 = tk.Button(root, text="5", width=10)
btn6 = tk.Button(root, text="6", width=10)
btn7 = tk.Button(root, text="7", width=10)
btn8 = tk.Button(root, text="8", width=10)
btn9 = tk.Button(root, text="9", width=10)

# 더하기 빼기 버튼 위치(Grid)
btn_min.grid(row=4, column=1)
btn_plus.grid(row=4, column=3)

btn0.grid(row=4, column=2)
btn1.grid(row=3, column=1)
btn2.grid(row=3, column=2)
btn3.grid(row=3, column=3)
btn4.grid(row=2, column=1)
btn5.grid(row=2, column=2)
btn6.grid(row=2, column=3)
btn7.grid(row=1, column=1)
btn8.grid(row=1, column=2)
btn9.grid(row=1, column=3)
root.mainloop()
5. Frame에 대해서
Palce, Pack, Gird는 동일한 프레임 내에서 사용할 수 없으므로, 다양한 배치방법을 사용하기 위해서는 Frame을 나눠줘야 합니다.
Frame 또한 같은 방법으로 배치를 해야합니다.
root 라는 Window 내에 frame이 배치됩니다.
button = tk.Button(생성한 프레임)Place
  frame = tk.Frame(root)
  frame.place(x=1, y=1)

  button = tk.Button(frame, text="절대좌표 프레임속")
  button.pack()
Pack
  frame = tk.Frame(root)
  frame.pack(side="top")

  button = tk.Button(frame, text="상대위치 프레임속")
  button.pack()
Grid
  frame = tk.Frame(root)
  frame.grid(row=1, column=1)

  button = tk.Button(frame, text="격자형태 프레임속")
  button.pack()
이렇게 생성한 프레임에 원하는 위젯을 원하는 배치형태로 넣습니다.
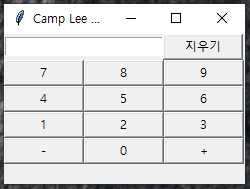
예제 (기능은 넣지 않았습니다.)
## tkinter를 tk로 선언
import tkinter as tk

## Tk setup
root = tk.Tk()

# GUI Window 제목 설정
root.title("Camp Lee Python")
# GUI Window 사이즈 설정
root.geometry("240x150")

# 상단 프레임 (Pack 사용)
frame_top = tk.Frame(root)
frame_top.pack(side="top")

entry = tk.Entry(frame_top, width=22)
entry.pack(side="left")
btn_clear = tk.Button(frame_top, text="지우기", width=10)
btn_clear.pack(side="right")

# 하단 프레임 (Grid 사용)
frame_bot = tk.Frame(root)
frame_bot.pack(side="top")

btn_min = tk.Button(frame_bot, text="-", width=10)
btn_plus = tk.Button(frame_bot, text="+", width=10)
btn0 = tk.Button(frame_bot, text="0", width=10)
btn1 = tk.Button(frame_bot, text="1", width=10)
btn2 = tk.Button(frame_bot, text="2", width=10)
btn3 = tk.Button(frame_bot, text="3", width=10)
btn4 = tk.Button(frame_bot, text="4", width=10)
btn5 = tk.Button(frame_bot, text="5", width=10)
btn6 = tk.Button(frame_bot, text="6", width=10)
btn7 = tk.Button(frame_bot, text="7", width=10)
btn8 = tk.Button(frame_bot, text="8", width=10)
btn9 = tk.Button(frame_bot, text="9", width=10)

# 더하기 빼기 버튼 위치(Grid)
btn_min.grid(row=4, column=1)
btn_plus.grid(row=4, column=3)

btn0.grid(row=4, column=2)
btn1.grid(row=3, column=1)
btn2.grid(row=3, column=2)
btn3.grid(row=3, column=3)
btn4.grid(row=2, column=1)
btn5.grid(row=2, column=2)
btn6.grid(row=2, column=3)
btn7.grid(row=1, column=1)
btn8.grid(row=1, column=2)
btn9.grid(row=1, column=3)
root.mainloop()
참고 링크 : Tkinter를 사용하여 계산기 만들기 예제 바로가기
python3.9 | camp-lee@naver.com
반응형
'[GUI] Tkinter' 카테고리의 다른 글
| [Tkinter 1편] 패키지 설치 및 간단 예제 (0) | 2021.11.25 |
|---|
